java锁
Java 锁简介
Java 提供了种类丰富的锁,每种锁因其特性的不同,在适当的场景下能够展现出非常高的效率。
java 主流锁如下图: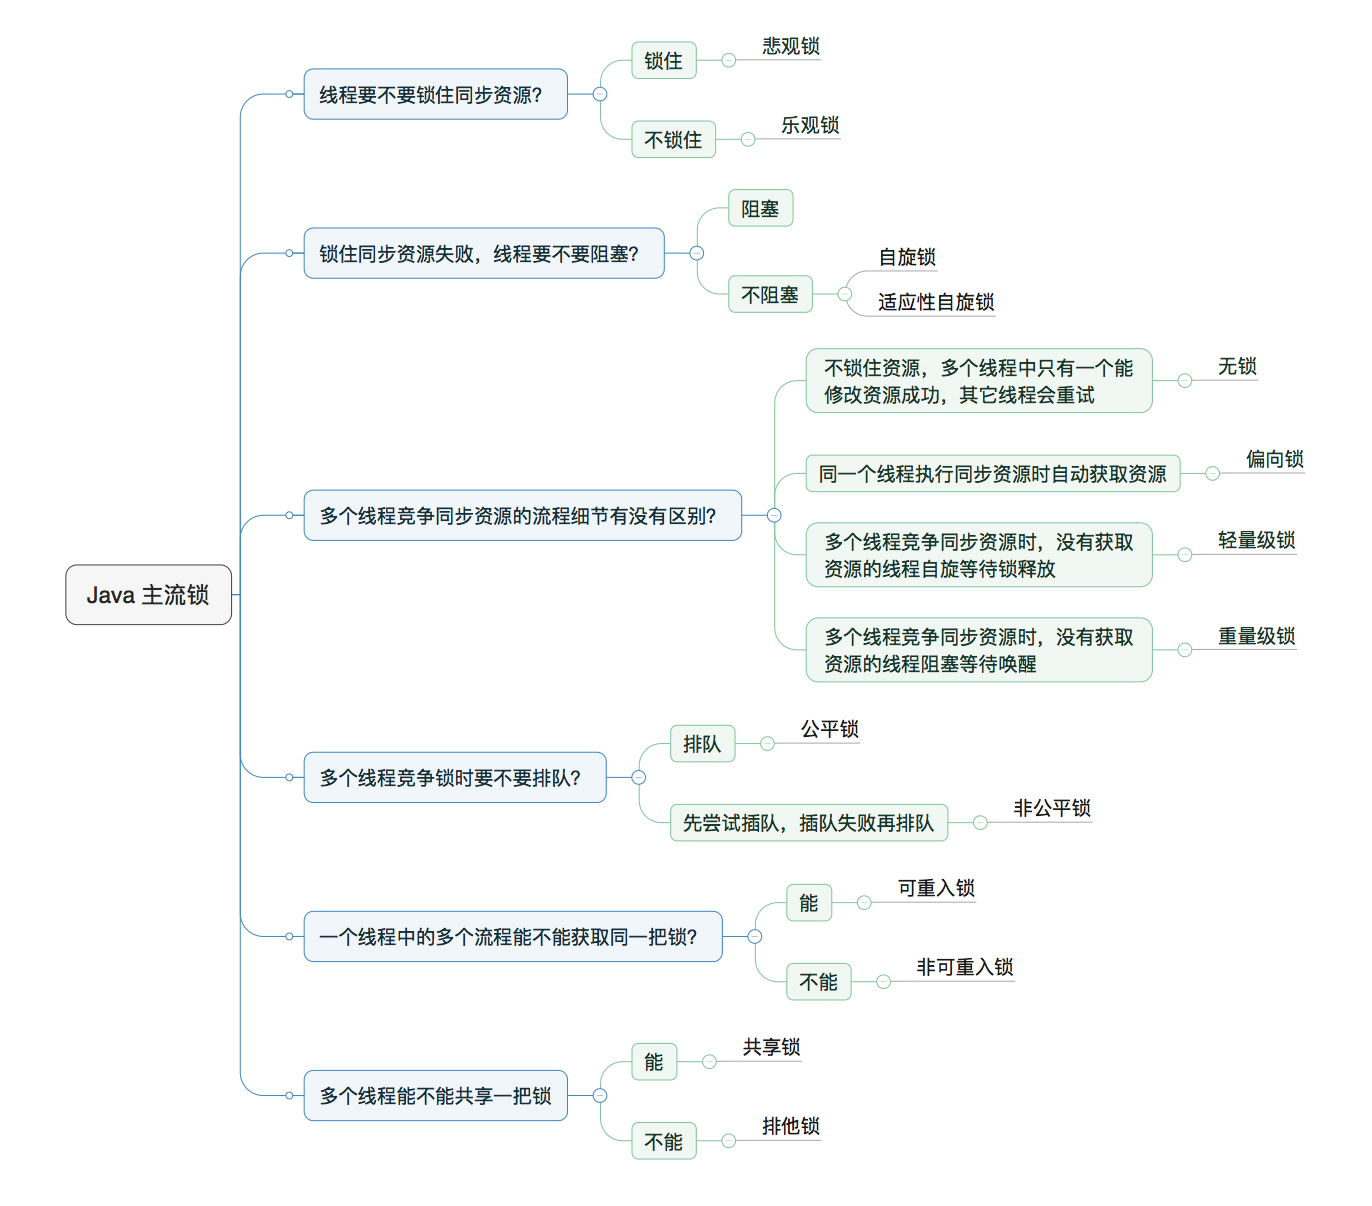
Java 对象头
Java 对象保存在内存中时,由 对象头(Header)、实例数据(Instance Data)、对齐填充(Padding) 三部分组成。在这儿主要介绍一下对象头。
java 对象头由三部分组成:
- Mark Word
- Klass Pointer(指向类的指针)
- Array Length(数组长度)(只有数组对象才有)
Mark Word
Mark Word 主要用来存储对象自身的运行时数据,如 hashcode、gc 分代年龄等。
Mark Word 的位长度为 JVM 的一个 Word 大小,也就是说 32 位 JVM 的 Mark word 为 32 位,64 位 JVM 为 64 位。为了让一个字大小存储更多的信息,JVM 将字的最低两个位设置为标记位。
Mark Word 在 32 位 JVM 中存储状态:
| Mark Word (32 bits) | State 含义 | ||||
|---|---|---|---|---|---|
| identity_hashcode:25 (对象的HashCode) |
age:4 | biased_lock:1 (是否偏向锁, 值: 0) |
state:2 (值: 01) |
Normal (无锁) |
|
| thread:23 (线程ID) |
epoch:2 | age:4 | biased_lock:1 (是否偏向锁, 值: 1) |
state:2 (值: 01) |
Biased (偏向锁) |
| ptr_to_lock_record:30 (指向栈中锁记录的指针) |
state:2 (值: 00) |
Lightweight Locked (轻量级锁) |
|||
| ptr_to_heavyweight_monitor:30 ( 指向重量级锁的指针) |
state:2 (值: 10) |
Heavyweight Locked (重量级锁) |
|||
| state:2 (值: 11) |
Marked for GC (GC标记) |
||||
| Mark Word (64 bits) | State 含义 | |||||
|---|---|---|---|---|---|---|
| unused:25 | identity_hashcode:31 (对象的HashCode) |
unused:1 | age:4 | biased_lock:1 (是否偏向锁, 值: 0) |
state:2 (值: 01) |
Normal (无锁) |
| thread:54 (线程ID) |
epoch:2 | unused:1 | age:4 | biased_lock:1 (是否偏向锁, 值: 1) |
state:2 (值: 01) |
Biased (偏向锁) |
| ptr_to_lock_record:62 (指向栈中锁记录的指针) |
state:2 (值: 00) |
Lightweight Locked (轻量级锁) |
||||
| ptr_to_heavyweight_monitor:62 ( 指向重量级锁的指针) |
state:2 (值: 10) |
Heavyweight Locked (重量级锁) |
||||
| state:2 (值: 11) |
Marked for GC (GC标记) |
|||||
Klass Pointer
这一部分用于存储对象的类型指针,该指针指向它的类元数据,JVM 通过这个指针确定对象是哪个类的实例。该指针的位长度为 JVM 的一个字大小,即 32 位的 JVM 为 32 位,64 位的 JVM 为 64 位。
如果应用的对象过多,使用 64 位的指针将浪费大量内存,统计而言,64 位的 JVM 将会比 32 位的 JVM 多耗费 50%的内存。为了节约内存可以使用选项+UseCompressedOops 开启指针压缩,其中,oop 即 ordinary object pointer 普通对象指针。
开启该选项后,下列指针将压缩至 32 位:
- 每个 Class 的属性指针(即静态变量)
- 每个对象的属性指针(即对象变量)
- 普通对象数组的每个元素指针
当然,也不是所有的指针都会压缩,一些特殊类型的指针 JVM 不会优化,比如指向 PermGen 的 Class 对象指针(JDK8 中指向元空间的 Class 对象指针)、本地变量、堆栈元素、入参、返回值和 NULL 指针等。
Array Length
如果对象是一个数组,那么对象头还需要有额外的空间用于存储数组的长度,这部分数据的长度也随着 JVM 架构的不同而不同:32 位的 JVM 上,长度为 32 位;64 位 JVM 则为 64 位。
64 位 JVM 如果开启+UseCompressedOops 选项,该区域长度也将由 64 位压缩至 32 位。
乐观锁 VS 悲观锁
乐观锁与悲观锁是一种广义上的概念,体现了看待线程同步的不同角度。在 Java 和数据库中都有此概念对应的实际应用。
对于同一个数据的并发操作,悲观锁认为自己在使用数据的时候一定有别的线程来修改数据,因此在获取数据的时候会先加锁,确保数据不会被别的线程修改。Java 中,synchronized 关键字和 Lock 的实现类都是悲观锁。
而乐观锁认为自己在使用数据时不会有别的线程修改数据,所以不会添加锁,只是在更新数据的时候去判断之前有没有别的线程更新了这个数据。如果这个数据没有被更新,当前线程将自己修改的数据成功写入。如果数据已经被其他线程更新,则根据不同的实现方式执行不同的操作(例如报错或者自动重试)。
乐观锁在 Java 中是通过使用无锁编程来实现,最常采用的是 CAS 算法,Java 原子类中的递增操作就通过 CAS 自旋实现的。
互斥量(mutex)
mutex 思想简单粗暴,多线程共享一个互斥量,然后线程之间去竞争,得到锁的线程可以进入临界区执行代码。mutex 是睡眠等待(sleep waiting)类型的锁,线程抢锁失败就进行休眠,锁状态改变后被唤醒。
操作系统负责线程调度,为了实现锁的状态发生改变时再唤醒,就需要把锁交给操作系统管理。所以互斥器的加锁操作通常都需要涉及到上下文切换,操作花销也就会比自旋锁要大。
信号量(Semaphore)
信号量(Semaphore),有时被称为信号灯,是在多线程环境下使用的一种设施, 它负责协调各个线程, 以保证它们能够正确、合理的使用公共资源。
POSIX 信号量标准定义了有名信号量和无名信号量两种,但 LinuxThreads 只实现了无名新号量,同时有名量除了总是可用于多进程之间以外,在使用上与无名量并没有很大的区别。
Semaphore 可以被抽象为五个操作:
- 创建 Create (CreateSemaphore / sem_init)
- 等待 Wait (WaitForSingleObject / sem _wait)
- 线程等待信号量,如果值大于 0,则获得,值减一;如果只等于 0,则一直线程进入睡眠状态,知道信号量值大于 0 或者超时。
- 释放 Post (ReleaseMutex / sem _post)
- 执行释放信号量,则值加一;如果此时有正在等待的线程,则唤醒该线程。
- 试图等待 TryWait (WaitForSingleObject / sem _trywait)
- 如果调用 TryWait,线程并不真正的去获得信号量,还是检查信号量是否能够被获得,如果信号量值大于 0,则 TryWait 返回成功;否则返回失败。
- 销毁 Destroy (CloseHandle / sem_destroy)
信号量与互斥量之间的区别
- 互斥量用于线程的互斥,信号线用于线程的同步。这是互斥量和信号量的根本区别,也就是互斥和同步之间的区别。
- 互斥:是指某一资源同时只允许一个访问者对其进行访问,具有唯一性和排它性。但互斥无法限制访问者对资源的访问顺序,即访问是无序的。
- 同步:是指在互斥的基础上(大多数情况),通过其它机制实现访问者对资源的有序访问。在大多数情况下,同步已经实现了互斥,特别是所有写入资源的情况必定是互斥的。少数情况是指可以允许多个访问者同时访问资源。
- 互斥量值只能为 0/1,信号量值可以为非负整数。
- 也就是说,一个互斥量只能用于一个资源的互斥访问,它不能实现多个资源的多线程同步问题。
- 信号量: 只要信号量的 value 大于 0,其他线程就可以 sem_wait 成功,成功后信号量的 value 减一。若 value 值不大于 0,则 sem_wait 使得线程阻塞,直到 sem_post 释放后 value 值加一,但是 sem_wait 返回之前还是会将此 value 值减一
- 互斥量: 只要被锁住,其他任何线程都不可以访问被保护的资源
- 互斥量的加锁和解锁必须由同一线程分别对应使用,信号量可以由一个线程释放,另一个线程得到。
- 作用域
- 信号量: 进程间或线程间(linux 仅线程间的无名信号量 pthread semaphore)
- 互斥量: 线程间
自旋锁
自旋锁也可以说成锁自旋,锁自旋是一种锁竞争机制,锁是一种状态
自旋锁与互斥量功能一样,唯一一点不同的就是互斥量阻塞后休眠让出 cpu,而自旋锁阻塞后不会让出 cpu,会一直忙等待,直到得到锁。
自旋锁在用户态使用的比较少,在内核使用的比较多!自旋锁的使用场景:锁的持有时间比较短,或者说小于 2 次上下文切换的时间(这一条件根据不同场景可以适当放宽)。
自旋锁在用户态的函数接口和互斥量一样,把 pthread_mutex_xxx()中 mutex 换成 spin,如:pthread_spin_init()。
过程可以简化为如下几步:
- 当前线程竞争锁失败时,打算阻塞自己
- 不直接阻塞自己,而是自旋(空等待,比如一个空的有限 for 循环)一会
- 在自旋的同时重新竞争锁
- 如果自旋结束前获得了锁,那么锁获取成功;否则,自旋结束后阻塞自己,此时与互斥量一致
缺点
- 单核处理器上,不存在实际的并行,当前线程不阻塞自己的话,旧 owner 就不能执行(原因:自旋占用 cpu,而 cpu 是单核),锁永远不会释放,此时不管自旋多久都是浪费;进而,如果线程多而处理器少,自旋也会造成不少无谓的浪费。
- 自旋锁要占用 CPU,如果是计算密集型任务,这一优化通常得不偿失,减少锁的使用是更好的选择。
- 如果锁竞争的时间比较长,那么自旋通常不能获得锁,白白浪费了自旋占用的 CPU 时间。这通常发生在锁持有时间长,且竞争激烈的场景中,此时应主动禁用自旋锁。
自适应自旋锁
自旋锁在 JDK1.4.2 中引入,使用-XX:+UseSpinning 来开启。JDK 6 中变为默认开启,并且引入了自适应的自旋锁(适应性自旋锁)。
自适应意味着自旋的时间(次数)不再固定,而是由前一次在同一个锁上的自旋时间及锁的拥有者的状态来决定。
如果在同一个锁对象上,自旋等待刚刚成功获得过锁,并且持有锁的线程正在运行中,那么虚拟机就会认为这次自旋也是很有可能再次成功,进而它将允许自旋等待持续相对更长的时间。
如果对于某个锁,自旋很少成功获得过,那在以后尝试获取这个锁时将可能省略掉自旋过程,直接阻塞线程,避免浪费处理器资源。
重量级锁
内置锁在 Java 中被抽象为监视器锁(monitor)。在 JDK 1.6 之前,监视器锁可以认为直接对应底层操作系统中的互斥量(mutex)。这种同步方式的成本非常高,包括系统调用引起的内核态与用户态切换、线程阻塞造成的线程切换等。因此,后来称这种锁为“重量级锁”。
java 中锁升级为重量级锁时,锁标志的状态值变为“10”,此时 Mark Word 中存储的是指向重量级锁的指针,此时等待锁的线程都会进入阻塞状态。
整体的锁状态升级流程如下:
graph LR
    A(无锁) --> B(偏向锁) --> C(轻量锁) --> D(重量锁)
轻量锁
轻量锁加锁过程:
- 竞争锁,尝试通过 CAS 设置对象头轻量级锁标志
- 失败后通过 自旋锁 来尝试获取锁
- 再次失败,升级为重量级锁
java 中的处理流程:
在代码进入同步块的时候,如果同步对象锁状态为无锁状态(锁标志位为“01”状态,是否为偏向锁为“0”),虚拟机首先将在当前线程的栈帧中建立一个名为锁记录(Lock Record)的空间,用于存储锁对象目前的 Mark Word 的拷贝,然后拷贝对象头中的 Mark Word 复制到锁记录中。
拷贝成功后,虚拟机将使用 CAS 操作尝试将对象的 Mark Word 更新为指向 Lock Record 的指针,并将 Lock Record 里的 owner 指针指向对象的 Mark Word。
如果这个更新动作成功了,那么这个线程就拥有了该对象的锁,并且对象 Mark Word 的锁标志位设置为“00”,表示此对象处于轻量级锁定状态。
如果轻量级锁的更新操作失败了,虚拟机首先会检查对象的 Mark Word 是否指向当前线程的栈帧,如果是就说明当前线程已经拥有了这个对象的锁,那就可以直接进入同步块继续执行,否则说明多个线程竞争锁。
若当前只有一个等待线程,则该线程通过自旋进行等待。但是当自旋超过一定的次数,或者一个线程在持有锁,一个在自旋,又有第三个来访时,轻量级锁升级为重量级锁。
偏向锁
偏向锁的目标是,减少无竞争且只有一个线程使用锁的情况下,使用轻量级锁产生的性能消耗。轻量级锁每次申请、释放锁都 至少 需要一次 CAS,但偏向锁只有初始化时需要一次 CAS。
偏向锁是指一段同步代码一直被一个线程所访问,那么该线程会自动获取锁,降低获取锁的代价。
在大多数情况下,锁总是由同一线程多次获得,不存在多线程竞争,所以出现了偏向锁。其目标就是在只有一个线程执行同步代码块时能够提高性能。
当一个线程访问同步代码块并获取锁时,会在 Mark Word 里存储锁偏向的线程 ID。在线程进入和退出同步块时不再通过 CAS 操作来加锁和解锁,而是检测 Mark Word 里是否存储着指向当前线程的偏向锁。引入偏向锁是为了在无多线程竞争的情况下尽量减少不必要的轻量级锁执行路径,因为轻量级锁的获取及释放依赖多次 CAS 原子指令,而偏向锁只需要在置换 ThreadID 的时候依赖一次 CAS 原子指令即可。
偏向锁只有遇到其他线程尝试竞争偏向锁时,持有偏向锁的线程才会释放锁,线程不会主动释放偏向锁。偏向锁的撤销,需要等待全局安全点(在这个时间点上没有字节码正在执行),它会首先暂停拥有偏向锁的线程,判断锁对象是否处于被锁定状态。撤销偏向锁后恢复到无锁(标志位为“01”)或轻量级锁(标志位为“00”)的状态。
偏向锁在 JDK 6 及以后的 JVM 里是默认启用的。可以通过 JVM 参数关闭偏向锁:-XX:-UseBiasedLocking=false,关闭之后程序默认会进入轻量级锁状态。
当锁是偏向锁的时候,被另外的线程所访问,偏向锁就会升级为轻量级锁,其他线程会通过自旋的形式尝试获取锁,不会阻塞,从而提高性能。
CAS
CAS 全称 Compare And Swap(比较与交换),是一种无锁算法。在不使用锁(没有线程被阻塞)的情况下实现多线程之间的变量同步。java.util.concurrent 包中的原子类就是通过 CAS 来实现了乐观锁。
CAS 算法涉及到三个操作数:
- 需要读写的内存值 V。
- 进行比较的值 A。
- 要写入的新值 B。
当且仅当 V 的值等于 A 时,CAS 通过原子方式用新值 B 来更新 V 的值(“比较+更新”整体是一个原子操作),否则不会执行任何操作。一般情况下,“更新”是一个不断重试的操作。
CAS 虽然很高效,但是它也存在三大问题:
- ABA 问题。CAS 需要在操作值的时候检查内存值是否发生变化,没有发生变化才会更新内存值。但是如果内存值原来是 A,后来变成了 B,然后又变成了 A,那么 CAS 进行检查时会发现值没有发生变化,但是实际上是有变化的。ABA 问题的解决思路就是在变量前面添加版本号,每次变量更新的时候都把版本号加一,这样变化过程就从“A-B-A”变成了“1A-2B-3A”。
- JDK 从 1.5 开始提供了 AtomicStampedReference 类来解决 ABA 问题,具体操作封装在 compareAndSet()中。compareAndSet()首先检查当前引用和当前标志与预期引用和预期标志是否相等,如果都相等,则以原子方式将引用值和标志的值设置为给定的更新值。
- 循环时间长开销大。CAS 操作如果长时间不成功,会导致其一直自旋,给 CPU 带来非常大的开销。
- 只能保证一个共享变量的原子操作。对一个共享变量执行操作时,CAS 能够保证原子操作,但是对多个共享变量操作时,CAS 是无法保证操作的原子性的。
- Java 从 1.5 开始 JDK 提供了 AtomicReference 类来保证引用对象之间的原子性,可以把多个变量放在一个对象里来进行 CAS 操作。
公平锁 VS 非公平锁
公平锁是指多个线程按照申请锁的顺序来获取锁,线程直接进入队列中排队,队列中的第一个线程才能获得锁。公平锁的优点是等待锁的线程不会饿死。缺点是整体吞吐效率相对非公平锁要低,等待队列中除第一个线程以外的所有线程都会阻塞,CPU 唤醒阻塞线程的开销比非公平锁大。
非公平锁是多个线程加锁时直接尝试获取锁,获取不到才会到等待队列的队尾等待。但如果此时锁刚好可用,那么这个线程可以无需阻塞直接获取到锁,所以非公平锁有可能出现后申请锁的线程先获取锁的场景。非公平锁的优点是可以减少唤起线程的开销,整体的吞吐效率高,因为线程有几率不阻塞直接获得锁,CPU 不必唤醒所有线程。缺点是处于等待队列中的线程可能会饿死,或者等很久才会获得锁。
可以查看 ReentrantLock 中 FairSync 和 NonfairSync 里获取锁的 tryAcquire() 方法:
1 | // FairSync |
通过上图中的源代码对比,我们可以明显的看出公平锁与非公平锁的 lock()方法唯一的区别就在于公平锁在获取同步状态时多了一个限制条件:hasQueuedPredecessors()。
hasQueuedPredecessors 源码:
1 | public final boolean hasQueuedPredecessors() { |
可以看到该方法主要做一件事情:主要是判断当前线程是否位于同步队列中的第一个。返回 true 代表有别的线程在 CHL 队列(CHL 队列就是 AQS 使用的同步队列)中排了当前线程之前;返回 false 代表当前线程处于 CHL 队列的第一个线程。
- 分析 h != t 返回 false 的情况。此时 hasQueuedPredecessors 返回 false。
- 当 h 和 t 都为 null,返回 false。此时说明队列为空,还从来没有 Node 入过队。
- 当 h 和 t 都指向同一个 Node,也返回 false。此时说明队列中只有一个 dummy node,那说明没有线程在队列中。
- 分析 h != t 返回 true,且(s = h.next) == null 返回 true,直接短路后面。此时 hasQueuedPredecessors 返回 true。
- 既然 h != t 返回 true,说明 h 和 t 不相等,先考虑特殊情况(“head 不为 null,tail 为 null”的情况,此时 head 是空 node,next 成员肯定为 null),那么说明有一个线程正在执行 enq,且它正好执行到 if (compareAndSetHead(new Node()))到 tail = head;的间隙。但这个线程肯定不是当前线程,所以不用判断后面短路的 s.thread != Thread.currentThread()了,因为当前线程连 enq 都没开始执行,但另一个线程都开始执行 enq 了,那不就是说明当前线程排在别人后面了,别的线程马上就要入队了。
- 既然 h != t 返回 true,说明 h 和 t 不相等,再考虑二者都不为 null。那此时队列中已经至少有一个等待中的线程了,那说明当前线程肯定排在别人后面了。
- 分析 h != t 返回 true,且(s = h.next) == null 返回 false,且 s.thread != Thread.currentThread()返回 true。此时 hasQueuedPredecessors 返回 true。如果 s.thread != Thread.currentThread()返回 false。此时 hasQueuedPredecessors 返回 false。
- 现在知道 head 不为 null,而且 head.next 也不为 null 了((s = h.next) == null 返回 false)。我们也知道队列中第一个等待的线程存放在 head.next 里(注意,head 为 dummy node,不存放线程),那么如果 head.next 的线程不是当前线程,那即说明当前线程已经排在别人线程后面了。
可重入锁 VS 非可重入锁
可重入锁又名递归锁,是指在同一个线程在外层方法获取锁的时候,再进入该线程的内层方法会自动获取锁(前提锁对象得是同一个对象或者 class),不会因为之前已经获取过还没释放而阻塞。Java 中 ReentrantLock 和 synchronized 都是可重入锁,可重入锁的一个优点是可一定程度避免死锁。下面用示例代码来进行分析:
1 | public class Widget { |
在上面的代码中,类中的两个方法都是被内置锁 synchronized 修饰的,doSomething()方法中调用 doOthers()方法。因为内置锁是可重入的,所以同一个线程在调用 doOthers()时可以直接获得当前对象的锁,进入 doOthers()进行操作。
如果是一个不可重入锁,那么当前线程在调用 doOthers()之前需要将执行 doSomething()时获取当前对象的锁释放掉,实际上该对象锁已被当前线程所持有,且无法释放。所以此时会出现死锁。
ReentrantLock 和 synchronized 都是重入锁,那么我们通过重入锁 ReentrantLock 以及非可重入锁 NonReentrantLock 的源码来对比分析一下为什么非可重入锁在重复调用同步资源时会出现死锁。
首先 ReentrantLock 和 NonReentrantLock 都继承父类 AQS,其父类 AQS 中维护了一个同步状态 status 来计数重入次数,status 初始值为 0。
当线程尝试获取锁时:
- 可重入锁先尝试获取并更新 status 值,如果 status == 0 表示没有其他线程在执行同步代码,则把 status 置为 1,当前线程开始执行。如果 status != 0,则判断当前线程是否是获取到这个锁的线程,如果是的话执行 status+1,且当前线程可以再次获取锁。
- 非可重入锁是直接去获取并尝试更新当前 status 的值,如果 status != 0 的话会导致其获取锁失败,当前线程阻塞。
释放锁时:
- 可重入锁同样先获取当前 status 的值,在当前线程是持有锁的线程的前提下。如果 status-1 == 0,则表示当前线程所有重复获取锁的操作都已经执行完毕,然后该线程才会真正释放锁。
- 非可重入锁则是在确定当前线程是持有锁的线程之后,直接将 status 置为 0,将锁释放。
可以简单理解为针对同一线程,可重入锁用信号量计数,非可重入锁用互斥量计数。
独享锁 VS 共享锁
独享锁和共享锁同样是一种概念。
独享锁也叫排他锁,是指该锁一次只能被一个线程所持有。如果线程 T 对数据 A 加上排它锁后,则其他线程不能再对 A 加任何类型的锁。获得排它锁的线程即能读数据又能修改数据。JDK 中的 synchronized 和 JUC 中 Lock 的实现类就是互斥锁。
共享锁是指该锁可被多个线程所持有。如果线程 T 对数据 A 加上共享锁后,则其他线程只能对 A 再加共享锁,不能加排它锁。获得共享锁的线程只能读数据,不能修改数据。
独享锁与共享锁也是通过 AQS 来实现的,通过实现不同的方法,来实现独享或者共享。
接下来通过 ReentrantLock 和 ReentrantReadWriteLock 的源码来看独享锁和共享锁:
ReentrantReadWriteLock 有两把锁:ReadLock 和 WriteLock,由词知意,一个读锁一个写锁,合称“读写锁”。再进一步观察可以发现 ReadLock 和 WriteLock 是靠内部类 Sync 实现的锁。Sync 是 AQS 的一个子类,这种结构在 CountDownLatch、ReentrantLock、Semaphore 里面也都存在。
在 ReentrantReadWriteLock 里面,读锁和写锁的锁主体都是 Sync,但读锁和写锁的加锁方式不一样。读锁是共享锁,写锁是独享锁。读锁的共享锁可保证并发读非常高效,而读写、写读、写写的过程互斥,因为读锁和写锁是分离的。所以 ReentrantReadWriteLock 的并发性相比一般的互斥锁有了很大提升。
AQS 有一个 state 字段(int 类型,32 位),该字段用来描述有多少线程获持有锁。在独享锁中这个值通常是 0 或者 1(如果是重入锁的话 state 值就是重入的次数),在共享锁中 state 就是持有锁的数量。
但是在 ReentrantReadWriteLock 中有读、写两把锁,所以需要在一个整型变量 state 上分别描述读锁和写锁的数量(或者也可以叫状态)。于是将 state 变量“按位切割”切分成了两个部分,高 16 位表示读锁状态(读锁个数),低 16 位表示写锁状态(写锁个数)。
写锁的加锁源码:
1 | protected final boolean tryAcquire(int acquires) { |
- 这段代码首先取到当前锁的个数 c,然后再通过 c 来获取写锁的个数 w。因为写锁是低 16 位,所以取低 16 位的最大值与当前的 c 做与运算( int w = exclusiveCount(c); ),高 16 位和 0 与运算后是 0,剩下的就是低位运算的值,同时也是持有写锁的线程数目。
- 在取到写锁线程的数目后,首先判断是否已经有线程持有了锁。如果已经有线程持有了锁(c!=0),则查看当前写锁线程的数目,如果写线程数为 0(即此时存在读锁)或者持有锁的线程不是当前线程就返回失败(涉及到公平锁和非公平锁的实现)。
- 如果写入锁的数量大于最大数(65535,2 的 16 次方-1)就抛出一个 Error。
- 如果当且写线程数为 0(那么读线程也应该为 0,因为上面已经处理 c!=0 的情况),并且当前线程需要阻塞那么就返回失败;如果通过 CAS 增加写线程数失败也返回失败。
- 如果 c=0,w=0 或者 c>0,w>0(重入),则设置当前线程或锁的拥有者,返回成功!
接着是读锁的代码:
1 | protected final int tryAcquireShared(int unused) { |
可以看到在 tryAcquireShared(int unused)方法中,如果其他线程已经获取了写锁,则当前线程获取读锁失败,进入等待状态。如果当前线程获取了写锁或者写锁未被获取,则当前线程(线程安全,依靠 CAS 保证)增加读状态,成功获取读锁。读锁的每次释放(线程安全的,可能有多个读线程同时释放读锁)均减少读状态,减少的值是“1<<16”。所以读写锁才能实现读读的过程共享,而读写、写读、写写的过程互斥。
AQS (AbstractQueuedSynchronizer)
AbstractQueuedSynchronizer 抽象类是核心,需要重点掌握。 它提供了一个基于 FIFO 队列,可以用于构建锁或者其他相关同步装置的基础框架。
带着 BAT 大厂的面试问题去理解
提示: 请带着这些问题继续后文,会很大程度上帮助你更好的理解相关知识点。
- 什么是 AQS? 为什么它是核心?
- AQS 的核心思想是什么? 它是怎么实现的? 底层数据结构等
- AQS 有哪些核心的方法?
- AQS 定义什么样的资源获取方式? AQS 定义了两种资源获取方式:
独占(只有一个线程能访问执行,又根据是否按队列的顺序分为公平锁和非公平锁,如ReentrantLock) 和共享(多个线程可同时访问执行,如Semaphore、CountDownLatch、CyclicBarrier)。ReentrantReadWriteLock可以看成是组合式,允许多个线程同时对某一资源进行读。 - AQS 底层使用了什么样的设计模式?
- AQS 的应用示例?
AQS 简介
AQS 是一个用来构建锁和同步器的框架,使用 AQS 能简单且高效地构造出应用广泛的大量的同步器,比如 ReentrantLock,Semaphore,其他的诸如 ReentrantReadWriteLock,SynchronousQueue,FutureTask 等等皆是基于 AQS 的。 当然,我们自己也能利用 AQS 非常轻松容易地构造出符合我们自己需求的同步器。
AQS 核心思想
AQS 核心思想是,如果被请求的共享资源空闲,则将当前请求资源的线程设置为有效的工作线程,并且将共享资源设置为锁定状态。 如果被请求的共享资源被占用,那么就需要一套线程阻塞等待以及被唤醒时锁分配的机制,这个机制 AQS 是用 CLH 队列锁实现的,即将暂时获取不到锁的线程加入到队列中。
CLH(Craig,Landin,and Hagersten)队列是一个虚拟的双向队列(虚拟的双向队列即不存在队列实例,仅存在结点之间的关联关系)。AQS 是将每条请求共享资源的线程封装成一个 CLH 锁队列的一个结点(Node)来实现锁的分配。
AQS 使用一个 int 成员变量来表示同步状态,通过内置的 FIFO 队列来完成获取资源线程的排队工作。 AQS 使用 CAS 对该同步状态进行原子操作实现对其值的修改。
1 | // 共享变量,使用volatile修饰保证线程可见性 |
状态信息通过 protected 类型的 getState,setState,compareAndSetState 进行操作
1 | // 返回同步状态的当前值 |
AQS 对资源的共享方式
AQS 定义两种资源共享方式
- Exclusive(独占):只有一个线程能执行,如 ReentrantLock。又可分为公平锁和非公平锁:
- 公平锁:按照线程在队列中的排队顺序,先到者先拿到锁
- 非公平锁:当线程要获取锁时,无视队列顺序直接去抢锁,谁抢到就是谁的
- Share(共享):多个线程可同时执行,如 Semaphore/CountDownLatch。Semaphore、CountDownLatCh、 CyclicBarrier、ReadWriteLock 我们都会在后面讲到。
ReentrantReadWriteLock 可以看成是组合式,因为 ReentrantReadWriteLock 也就是读写锁允许多个线程同时对某一资源进行读。
不同的自定义同步器争用共享资源的方式也不同。自定义同步器在实现时只需要实现共享资源 state 的获取与释放方式即可,至于具体线程等待队列的维护(如获取资源失败入队/唤醒出队等),AQS 已经在上层已经帮我们实现好了。
AQS 底层使用了模板方法模式
同步器的设计是基于模板方法模式的,如果需要自定义同步器一般的方式是这样(模板方法模式很经典的一个应用):
使用者继承 AbstractQueuedSynchronizer 并重写指定的方法。(这些重写方法很简单,无非是对于共享资源 state 的获取和释放) 将 AQS 组合在自定义同步组件的实现中,并调用其模板方法,而这些模板方法会调用使用者重写的方法。
这和我们以往通过实现接口的方式有很大区别,模板方法模式请参看:设计模式行为型 - 模板方法(Template Method)详解
AQS 使用了模板方法模式,自定义同步器时需要重写下面几个 AQS 提供的模板方法:
1 | // 该线程是否正在独占资源。只有用到condition才需要去实现它。 |
默认情况下,每个方法都抛出 UnsupportedOperationException。 这些方法的实现必须是内部线程安全的,并且通常应该简短而不是阻塞。AQS 类中的其他方法都是 final ,所以无法被其他类使用,只有这几个方法可以被其他类使用。
以 ReentrantLock 为例,state 初始化为 0,表示未锁定状态。A 线程 lock()时,会调用 tryAcquire()独占该锁并将 state+1。此后,其他线程再 tryAcquire()时就会失败,直到 A 线程 unlock()到 state=0(即释放锁)为止,其它线程才有机会获取该锁。当然,释放锁之前,A 线程自己是可以重复获取此锁的(state 会累加),这就是可重入的概念。但要注意,获取多少次就要释放多么次,这样才能保证 state 是能回到零态的。
AbstractQueuedSynchronizer 数据结构
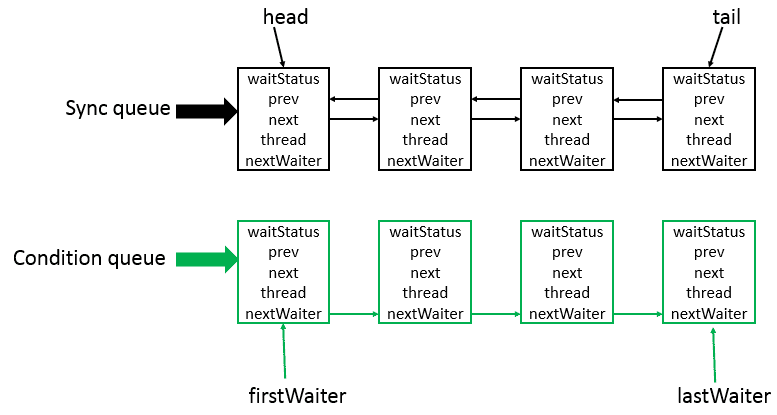
AbstractQueuedSynchronizer 类底层的数据结构是使用 CLH(Craig,Landin,and Hagersten)队列 是一个虚拟的双向队列(虚拟的双向队列即不存在队列实例,仅存在结点之间的关联关系)。 AQS 是将每条请求共享资源的线程封装成一个 CLH 锁队列的一个结点(Node)来实现锁的分配。 其中 Sync queue,即同步队列,是双向链表,包括 head 结点和 tail 结点,head 结点主要用作后续的调度。 而 Condition queue 不是必须的,其是一个单向链表,只有当使用 Condition 时,才会存在此单向链表。 并且可能会有多个 Condition queue。
AbstractQueuedSynchronizer 源码分析
类的继承关系
AbstractQueuedSynchronizer 继承自 AbstractOwnableSynchronizer 抽象类,并且实现了 Serializable 接口,可以进行序列化。
1 | public abstract class AbstractQueuedSynchronizer extends AbstractOwnableSynchronizer implements java.io.Serializable |
其中 AbstractOwnableSynchronizer 抽象类的源码如下:
1 | public abstract class AbstractOwnableSynchronizer implements java.io.Serializable { |
AbstractOwnableSynchronizer 抽象类中,可以设置独占资源线程和获取独占资源线程。 分别为 setExclusiveOwnerThread 与 getExclusiveOwnerThread 方法,这两个方法会被子类调用。
AbstractQueuedSynchronizer 类有两个内部类,分别为 Node 类与 ConditionObject 类。下面分别做介绍。
类的内部类 - Node 类
1 | static final class Node { |
每个线程被阻塞的线程都会被封装成一个 Node 结点,放入队列。 每个节点包含了一个 Thread 类型的引用,并且每个节点都存在一个状态,具体状态如下:
- 值为 0,表示当前节点在 sync queue 中,等待着获取锁。
CANCELLED,值为 1,表示当前的线程被取消。SIGNAL,值为-1,表示当前节点的后继节点包含的线程需要运行,需要进行 unpark 操作。CONDITION,值为-2,表示当前节点在等待 condition,也就是在 condition queue 中。PROPAGATE,值为-3,表示当前场景下后续的 acquireShared 能够得以执行。
类的内部类 - ConditionObject 类
1 | public class ConditionObject implements Condition, java.io.Serializable { |
此类实现了 Condition 接口,Condition 接口定义了条件操作规范,具体如下:
1 | public interface Condition { |
Condition 接口中定义了 await、signal 方法,用来等待条件、释放条件。
类的属性
属性中包含了头节点 head,尾结点 tail,状态 state、自旋时间 spinForTimeoutThreshold,还有 AbstractQueuedSynchronizer 抽象的属性在内存中的偏移地址,通过该偏移地址,可以获取和设置该属性的值,同时还包括一个静态初始化块,用于加载内存偏移地址。
1 | public abstract class AbstractQueuedSynchronizer |
类的构造方法
此类构造方法为 protected
1 | // 创建一个初始同步状态为0的新AbstractQueuedSynchronizer实例 |
类的核心方法 - acquire 方法
该方法以独占模式获取(资源),忽略中断,即线程在 aquire 过程中,中断此线程是无效的。源码如下:
1 | public final void acquire(int arg) { |
由上述源码可以知道,当一个线程调用 acquire 时,调用方法流程如下
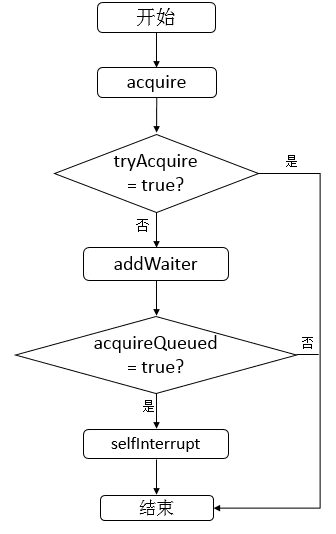
- 首先调用 tryAcquire 方法,调用此方法的线程会试图在独占模式下获取对象状态。此方法应该查询是否允许它在独占模式下获取对象状态,如果允许,则获取它。在 AbstractQueuedSynchronizer 源码中默认会抛出一个异常,即需要子类去重写此方法完成自己的逻辑。之后会进行分析。
- 若 tryAcquire 失败,则调用 addWaiter 方法,addWaiter 方法完成的功能是将调用此方法的线程封装成为一个结点并放入 Sync queue。
- 调用 acquireQueued 方法,此方法完成的功能是 Sync queue 中的结点不断尝试获取资源,若成功,则返回 true,否则,返回 false。
- 由于 tryAcquire 默认实现是抛出异常,所以此时,不进行分析,之后会结合一个例子进行分析。
首先分析 addWaiter 方法
1 | // 添加等待者 |
addWaiter 方法使用快速添加的方式往 sync queue 尾部添加结点,如果 sync queue 队列还没有初始化,则会使用 enq 插入队列中,enq 方法源码如下
1 | private Node enq(final Node node) { |
enq 方法会使用无限循环来确保节点的成功插入。
现在,分析 acquireQueue 方法。其源码如下
1 | // sync队列中的结点在独占且忽略中断的模式下获取(资源) |
首先获取当前节点的前驱节点,如果前驱节点是头节点并且能够获取(资源),代表该当前节点能够占有锁,设置头节点为当前节点,返回。 否则,调用 shouldParkAfterFailedAcquire 和 parkAndCheckInterrupt 方法,首先,我们看 shouldParkAfterFailedAcquire 方法,代码如下
1 | // 当获取(资源)失败后,检查并且更新结点状态 |
只有当该节点的前驱结点的状态为 SIGNAL 时,才可以对该结点所封装的线程进行 park 操作。否则,将不能进行 park 操作。再看 parkAndCheckInterrupt 方法,源码如下
1 | // 进行park操作并且返回该线程是否被中断 |
parkAndCheckInterrupt 方法里的逻辑是首先执行 park 操作,即禁用当前线程,然后返回该线程是否已经被中断。再看 final 块中的 cancelAcquire 方法,其源码如下
1 | // 取消继续获取(资源) |
该方法完成的功能就是取消当前线程对资源的获取,即设置该结点的状态为 CANCELLED,接着我们再看 unparkSuccessor 方法,源码如下
1 | // 释放后继结点 |
该方法的作用就是为了释放 node 节点的后继结点。
对于 cancelAcquire 与 unparkSuccessor 方法,如下示意图可以清晰的表示:
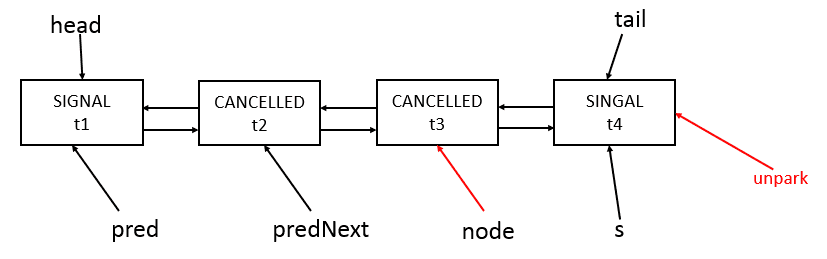
其中 node 为参数,在执行完 cancelAcquire 方法后的效果就是 unpark 了 s 结点所包含的 t4 线程。
现在,再来看 acquireQueued 方法的整个的逻辑。逻辑如下:
- 判断结点的前驱是否为 head 并且是否成功获取(资源)。
- 若步骤 1 均满足,则设置结点为 head,之后会判断是否 finally 模块,然后返回。
- 若步骤 2 不满足,则判断是否需要 park 当前线程,是否需要 park 当前线程的逻辑是判断结点的前驱结点的状态是否为 SIGNAL,若是,则 park 当前结点,否则,不进行 park 操作。
- 若 park 了当前线程,之后某个线程对本线程 unpark 后,并且本线程也获得机会运行。那么,将会继续进行步骤 ① 的判断。
类的核心方法 - release 方法
以独占模式释放对象,其源码如下:
1 | public final boolean release(int arg) { |
其中,tryRelease 的默认实现是抛出异常,需要具体的子类实现,如果 tryRelease 成功,那么如果头节点不为空并且头节点的状态不为 0,则释放头节点的后继结点,unparkSuccessor 方法已经分析过,不再累赘。
对于其他方法我们也可以分析,与前面分析的方法大同小异,所以,不再累赘。
示例
AbstractQueuedSynchronizer 示例详解一
AbstractQueuedSynchronizer 示例详解二
AbstractQueuedSynchronizer 总结
对于 AbstractQueuedSynchronizer 的分析,最核心的就是 sync queue 的分析。
- 每一个结点都是由前一个结点唤醒
- 当结点发现前驱结点是 head 并且尝试获取成功,则会轮到该线程运行。
- condition queue 中的结点向 sync queue 中转移是通过 signal 操作完成的。
- 当结点的状态为 SIGNAL 时,表示后面的结点需要运行。